Note: the article has been updated to reflect Vertical Pod Autoscaler version 1.1.2, released on 2024-05-16.
This is a complete guide to Vertical Pod Autoscaling in Kubernetes.
In this new guide, you’ll learn:
- Why do we need Vertical Pod Autoscaling?
- Kubernetes Resource Requirements Model
- What is Vertical Pod Autoscaling?
- Understanding Recommendations
- When to use VPA?
- VPA Limitations
- Real-World Examples
- How does VPA work?
- VPA’s Recommendation model
- Lots more
Let’s get started.
Why do we need Vertical Pod Autoscaling?
When you deploy a new application to Kubernetes, you need to specify its resource requirements. Typically, engineers start with some random number copy-pasted from somewhere. As you develop and deploy more and more applications, there will be many more resource requirement speculations. And the difference between actual usage and resource requirements will compound.
Guessing correct resource requirements is a nuisance to the developers. It is hard to estimate how many resources an application needs to run optimally: the right combination of CPU power, memory, and the number of concurrently running replicas.
Application usage patterns might change over time. Some applications will need more CPU and Memory, while others are less popular; thus, the resource requirements should be smaller.
- Under subscription, it is typically fixed by DevOps or SREs when they get paged. Site Reliability Engineers see that the application is dropping end-user requests due to Out-of-Memory kills or is slow due to CPU throttling.
- Oversubscription doesn’t cause an immediate problem but contributes to massive aggregate resource wastage. Thus, your infrastructure or platform team must keep adding more Kubernetes nodes despite low resource utilization.
Autoscaling tries to solve these problems. Horizontal Autoscaling solves the problem of running the optimal number of replicas for your application. For example, maybe you are running too many pods, contributing to resource wastage.
Meanwhile, Vertical Autoscaling is solving setting correct CPU & Memory requirements. In this article, we will only look at Vertical Pod Autoscaling. There is also work going on combining these two into Multi-dimensional Pod Autoscaler.
Let’s start first by understanding the Kubernetes resource requirements model.
Kubernetes Resource Requirements Model
Kubernetes makes users specify resource requirements using resource requests and resource limits. Let’s start with resource requests:
Resource requests are reserved resources for your application. You can specify the resource request for Containers in a Pod. Then, the scheduler uses this information to decide where to place the Pod. You can think of resource requests as the minimum resources your Pod needs to operate successfully.
It’s important to note that your application can use more resources if a node has some slack resources available. Limits provide a way for you to tell what the maximum resources your container can use are. If memory exceeds your specified limit, the whole Pod gets killed. It gets throttled if your container uses more CPU time than the limit.
Limits are effectively a safety valve. They protect you from consuming an unbounded amount of memory if your application has a memory leak. Similarly, they save you from starving the CPU from other applications. Imagine somebody deploying Bitcoin miners, which would cause CPU starvation for all the applications in the cluster.
Importantly, you will only get those resources if there are slack resources on the scheduled node. You are only guaranteed to get what you request if available capacity exists.
Additionally, if you don’t specify requests, Kubernetes will automatically set requests to equal to Pod’s limits.
Setting only requests is a common mistake. Many users do it, hoping that their application can consume unbounded resources and don’t need to deal with out-of-memory kills or CPU throttling. Kubernetes doesn’t allow that, so make sure to set both requests and limits for the best outcome.
Moreover, this resource model is extendible:
Different computing resources, such as Ephemeral storage, GPUs, and Linux Kernel Huge Pages, exist.
For this article, we focus only on CPU and Memory, as Vertical Pod Autoscaler currently only works on these resources. If you are interested in learning more, you can read about it in the Managing Resources for Containers documentation.
What is Vertical Pod Autoscaling?
Vertical Pod Autoscaling (VPA in short) provides an automatic way to set the container’s resource requests and limits. It uses historic CPU and memory usage data to fine-tune the container’s resource requirements.
VPA’s primary goal is to reduce resource wastage while minimizing the risk of performance degradation due to CPU throttling or errors due to out-of-memory kills.
VPA maintainers are engineers from Google. And based on experience from building a similar in-house built system for its container orchestrator named Borg. The system is called Autopilot. What Google found by using Autopilot in production:
In practice, Autopiloted jobs have a slack of just 23%, compared with 46% for manually-managed jobs. Additionally, Autopilot reduces the number of jobs severely impacted by OOMs by a factor of 10.
Autopilot: workload autoscaling at Google
You can learn more about it in the paper Autopilot: workload autoscaling at Google.
VPA introduces a couple of Custom Resource Definitions (CRD for short) to control the behavior of automatic recommendations. Typically, Developers add a VerticalPodAutoscaler object to their application deployments.
Let’s figure out how to use it.
How to Use Vertical Pod Autoscaling?
VPA custom resource definition gives many options for controlling recommendations. To get a better idea of using Vertical Pod Autoscaler, let’s take a look at this detailed example of the VerticalPodAutoscaler object:
apiVersion: autoscaling.k8s.io/v1
kind: VerticalPodAutoscaler
metadata:
  name: prometheus-vpa
spec:
  targetRef:
    apiVersion: "apps/v1"
    kind: StatefulSet
    name: prometheus
  updatePolicy:
    updateMode:  Recreate
  evictionRequirements:
    - resources: ["cpu", "memory"]
      changeRequirement: TargetHigherThanRequests
  resourcePolicy:
    containerPolicies:
      - containerName: '*'
        minAllowed:
          cpu: 0m
          memory: 0Mi
        maxAllowed:
          cpu: 1
          memory: 500Mi
        controlledResources: ["cpu", "memory"]
        controlledValues: RequestsAndLimits
You start writing VerticalPodAutoscaler by setting targetRef, which points to some Kubernetes controller object that manages pods.
VPA supports all well-known controller types, such as Deployment, StatefulSet, DaemonSet, and CronJobs. It should also work with any custom type that implements a scale subresource. VPA retrieves the set of Pods via the controller’s ScaleStatus method. In this example, we are autoscaling a StatefulSet named “prometheus”.
Next, the updateMode field allows you to choose the operation mode for this controller. There are multiple options:
- Off – VPA will not automatically change resource requirements. Autoscaler computes the recommendations and stores them in the VPA object’s status field.
- Initial – VPA only assigns resource requests on pod creation and never changes them later.
- Recreate – VPA assigns resource requests on pod creation and updates them on existing pods by evicting them when the requested resources differ significantly from the new recommendation.
- Auto mode – currently does the same as Recreate. In the future, it may take advantage of restart-free updates once they are available.
The optional evictionRequirements setting allows you to control eviction behavior when Recreate or Auto mode is on. You can select to evict only on upscaling, i.e., the TargetHigherThanRequests option, or downscaling, the TargetLowerThanRequests option. The policy can also be different based on CPU or memory resources.
Then, we need to define a resource policy for each container in the pod. Resource policies allow you to choose which container to provide resource recommendations and how to do so.
You provide a list of resource policies that are filtered by containerName. You can select a specific container in the Pod that matches a resource policy. Additionally, you can set containerName to * to establish a default resource policy.
Optionally, resource policies allow you to cap resource recommendations to a range defined in minAllowed and maxAllowed. If you don’t set minAllowed and maxAllowed, resources are not limited.
Additionally, you can choose which resources will get recommendations by setting controlledResources. The only supported values are “cpu” and “memory”. If not specified, VPA computes both CPU & memory recommendations.
Lastly, setting the controlledValues field allows you to choose whether to update the Container’s resource requests – RequestsOnly option or both resource requests and limits – RequestsAndLimits option. The default value is RequestsAndLimits.
If you choose the RequestsAndLimits option, requests are computed based on actual usage. Meanwhile, limits are calculated based on the current Pod’s request and limit ratio. For example, if you start with the Pod that requests 1 CPU and sets limits to 2 CPUs, VPA will always set the limit to be twice as much as requests. The same principle applies to memory. So, in the RequestsAndLimits mode, treat your initial application resource requests and limits as a template.
You can simplify VPA objects by using Auto mode and computing recommendations for both CPU and Memory. So, the VPA object can be simplified into this:
apiVersion: autoscaling.k8s.io/v1
kind: VerticalPodAutoscaler
metadata:
  name: vpa-recommender
spec:
  targetRef:
    apiVersion: "apps/v1"
    kind: Deployment
    name: vpa-recommender
  updatePolicy:
    updateMode: Auto
  resourcePolicy:
    containerPolicies:
      - containerName: '*'
        controlledResources: ["cpu", "memory"]
Now, let’s examine the recommendations provided by the Vertical Pod Autoscaler in the status field of the VPA custom resource definition.
Understanding Recommendations
After applying the VerticalPodAutoscaler object, VPA collects usage data and computing resource recommendations. After some time passes, you should see resource recommendations in your VerticalPodAutoscaler object’s status field.
You can view estimations by executing:
kubectl describe vpa NAMELet’s analyze an example status report:
Status:
  Conditions:
    Last Transition Time:  2020-12-23T08:03:07Z
    Status:                True
    Type:                  RecommendationProvided
  Recommendation:
      Container Recommendations:
      Container Name:  prometheus
      Lower Bound:
          Cpu:     25m
          Memory:  380220488
      Target:
          Cpu:     410m
          Memory:  380258472
      Uncapped Target:
          Cpu:     410m
          Memory:  380258472
      Upper Bound:
          Cpu:     704m
          Memory:  464927423
As you can see, four different estimations are provided for the “prometheus” container. Memory estimation values are in bytes. In CPU estimations, m means millicores. Let’s figure out what these estimations mean:
The lower bound is the minimum estimation for the container. This amount is not guaranteed to be sufficient for the application to be stable. Running with smaller CPU and memory requests is likely to significantly impact performance or availability.
The upper bound is the maximum recommended resource estimation for the container. Resource requests higher than these values are likely to be wasted.
VPA uses target estimation to set resource requests.
All of these estimations are capped based on minimum allowed and maximum allowed container policies.
The uncapped target estimation is a target estimation produced if there are no minimum and maximum allowed restrictions.
Why do we need four estimations? Well, Vertical Pod Autoscaler uses lower and upper bounds to evict pods. If the current resource request is lower than the lower bound or greater than the upper bound and there is a 10% change in resource requests versus the target estimation, then eviction might happen.
One neat thing is that VPA adds Pod annotations when resource requirements are changed. If you describe the Pod controlled by VPA, you can see annotations like vpaObservedContainers, which lists observed Containers, and vpaUpdates, which describes actions taken. Additionally, you can tell that the recommendation is limited to minAllowed, maxAllowed, or Kubernetes LimitRange object. Here is an example of Pod annotations:
apiVersion: v1
kind: Pod
metadata:
  annotations:
    vpaObservedContainers: recommender
    vpaUpdates: 'Pod resources updated by vpa-recommender: container 0: cpu request, memory request, cpu limit, memory limit'
Let’s figure out when to use Vertical Pod Autoscaler.
When to use VPA?
Firstly, you can add VPA to your databases and stateful workloads if you are running them on top of Kubernetes. Typically, stateful workloads are harder to scale horizontally, so having an automatic way to scale up resource consumption or compute good estimation helps solve capacity problems. If your database is not highly available or cannot tolerate disruptions, you can set the mode to Initial or Off. In this mode, VPA will never evict pods. It will either recommend or update the requests once the application has rolled.
Another good use case is CronJobs. Vertical Pod Autoscaler can learn the resource consumption for your recurring jobs and then apply the learned recommendation to a newly scheduled run. You just set the recommendation mode to Initial. This way, each recently launched Job will get recommendations calculated from the previous Job’s run. It’s important to note this will not work for short-lived (less than 1 minute) jobs.
Thirdly, Stateless workloads are a good target for Vertical Pod Autoscaling. Stateless applications usually are more tolerant of disruptions and evictions, so it’s an excellent place to start. You can test the Auto or Recreate mode. One significant limitation is that it won’t work with Horizontal Pod Autoscaler if you are Autoscaling on the same metrics: CPU or Memory. Typically, you can add VPA to applications that have predictable resource usage, and running more than a few replicas doesn’t make sense. It doesn’t make sense to scale these types of applications using Horizontal Pod Autoscaler, so VPA is the right choice.
It’s important to know that currently, Vertical Pod Autoscaler has some limitations, so it’s essential to know when not to use it.
VPA Limitations
Firstly, don’t use Vertical Pod autoscaling with JVM-based workloads. JVM provides limited visibility into the actual memory usage, so recommendations might be off.
Secondly, don’t use the Vertical Pod Autoscaler with the Horizontal Pod Autoscaler, which scales based on the same metrics: CPU or memory usage. However, you can use VPA with HPA, which uses custom metrics.
Thirdly, VPA recommendations might exceed available resources, such as your cluster capacity or your team’s quota. Not enough available resources may cause pods to go pending. You can set LimitRange objects to limit resource requests per namespace. Additionally, you can set the maximum allowed resource recommendations per Pod in a VerticalPodAutoscaler object.
Fourthly, VPA in Auto or Recreate mode won’t evict pods with one replica, as this would cause disruption. However, you can change this behavior if you still want automatic recommendations for your single replica applications. The updater component has a --min-replicas flag.
Fifthly, when using RequestsAndLimits mode, set initial CPU limits to accommodate a large number of requests. There is a Kubernetes/ Linux kernel issue that leads to over throttling. Many Kubernetes users either disable CPU throttling or set huge CPU limits to solve this problem. Typically, this is not a problem as CPU utilization on the cluster nodes is low.
Sixthly, not all VPA recommendations succeed. Let’s say you run a highly available system with two replicas, and one of the Containers decides to grow the memory quickly. Quick memory growth might cause the container to be Out of Memory. As Out Of Memory killed pods aren’t rescheduled, VPA won’t apply new resource recommendations. Pod eviction won’t happen, as one Pod is always either not ready or crash looping. Thus, you are in a deadlock. The only way to resolve these situations is by killing the Pod and letting new resource recommendations sink in.
Now, let’s take a look at some real-world examples.
Real-World Examples
MongoDB Cluster
Let’s start with a replicated MongoDB cluster with 3 replicas. Initial Statefulset’s resource requirements are:
resources:
  limits:
    memory: 10Gi
  requests:
    memory: 6Gi
We set the Pod Disruption Budget to allow only a single replica to be down.
Then, we deploy the StatefulSet without Vertical Pod Autoscaling and let it run for a while.
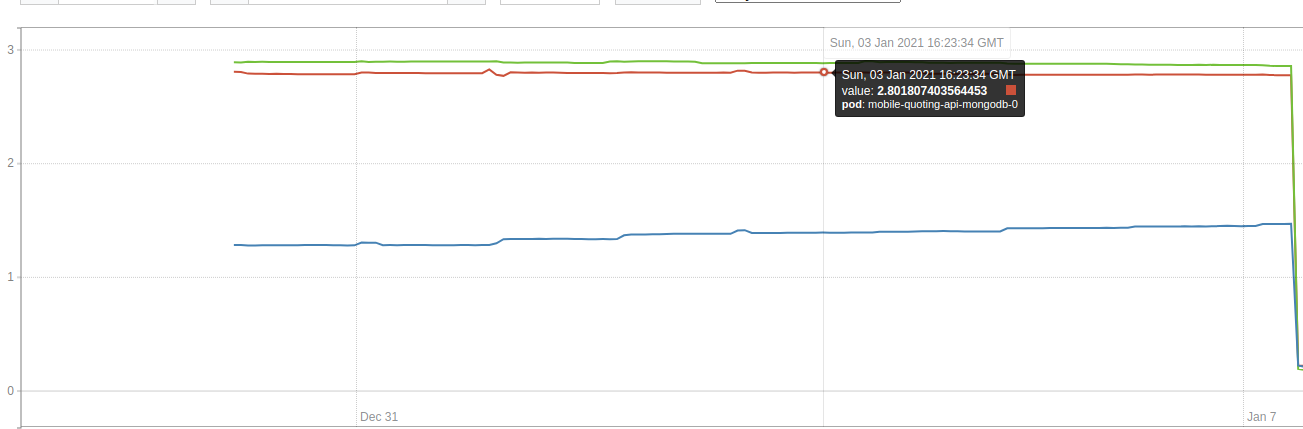
This graph shows the MongoDB cluster memory usage. Each line is a replica. As you can see, the actual memory usage for two replicas is close to 3GiB and one close to 1.5GiB.
After some time passes, we automate resource requirements with Vertical Pod Autoscaler object set in Auto mode, autoscaling both CPU and Memory. VPA computes the recommendation and evicts pods one by one. Here is what a recommendation looks like:
Container Recommendations:
  Container Name:  mongodb
  Lower Bound:
    Cpu:     12m
    Memory:  3480839981
  Target:
    Cpu:     12m
    Memory:  3666791614
  Uncapped Target:
    Cpu:     12m
    Memory:  3666791614
  Upper Bound:
    Cpu:     12m
    Memory:  3872270071
VPA sets memory requests to 3.41GiB, limits to 5.6GiB (same ratio as 6GiB – 10GiB), and CPU requests and limits to 10 millicores.
Let’s see how it compares to initial estimates. We saved 1.6 GiB of requested memory per pod, so we requested 4.2 GiB less memory in total. It might not be a big difference for this single instance, but it compounds if you run many MongoDB clusters.
etcd
Another example is etcd, etcd is a highly available database that uses raft leader election. The initial resource estimate didn’t set any memory resource requests, just CPU:
Limits:
  cpu: 7                                                                                                                                                    Requests:
  cpu:  10m
Then, we deploy the StatefulSet without Vertical Pod Autoscaling and let it run for a while.
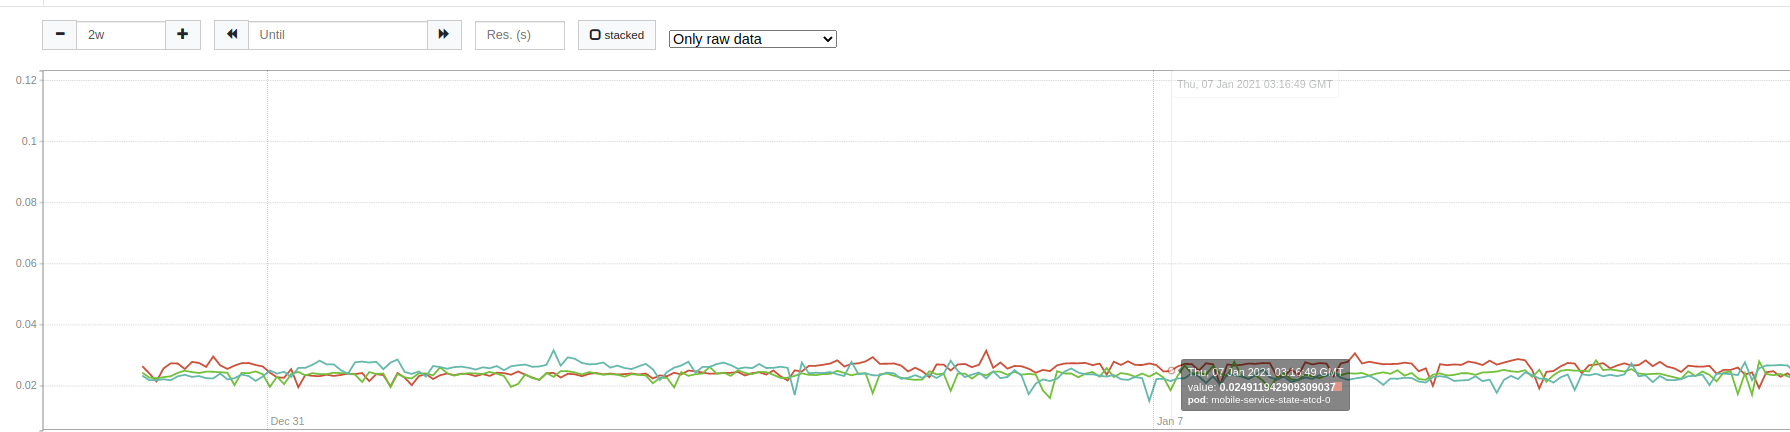
This graph shows the usage of the etcd cluster memory. Each line is a replica. As you can see, one replica’s memory usage is close to 500Mib, while the other two use close to 300Mib.
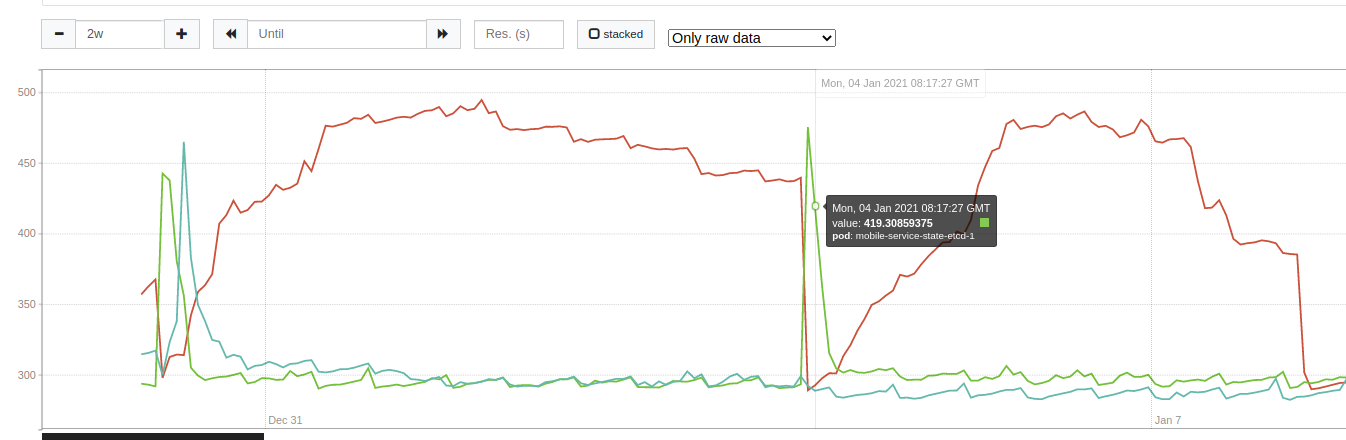
This graph shows the usage of the etcd cluster CPU. As you can see, the CPU is relatively constant and close to 0.03 CPU cores.
Here is what the VPA recommendation looks like:
  Recommendation:
    Container Recommendations:
      Container Name:  etcd
      Lower Bound:
        Cpu:     25m
        Memory:  587748019
      Target:
        Cpu:     93m
        Memory:  628694953
      Uncapped Target:
        Cpu:     93m
        Memory:  628694953
      Upper Bound:
        Cpu:     114m
        Memory:  659017860
VPA sets memory requests to 599MiB with no limits, CPU requests to 93 millicores (0.093 cores), and limits to 65 cores, as the request-to-limits ratio is 700.
In total, VPA reserved more capacity for etcd to run successfully. Previously, we didn’t request any memory for this Pod, which might have scheduled it into an overutilized node and caused issues. Similarly, CPU requests were too low for etcd to run.
Interestingly, the current leader uses significantly more memory than secondaries. As VPA recommended resources, it gave the same recommendation to all the replicas. Thus, there is a gap between what you need to reserve and what you use. As secondaries will not use more than 300MiB memory until they become primaries, the node will have some extra space.
However, in this example, this gap is adequate. If the current leader stepped down, the secondary would have to take over the work, which would cause it to start using those reserved resources. If we didn’t secure those resources, the new replica could be out of memory killed, which would cause downtime.
Backup CronJob
This last example shows a simple backup CronJob, which takes a copy of a MongoDB database and stores it in S3. It runs daily, and typically it takes about 12 minutes to complete.
The initial estimate didn’t set any resource requirements. Vertical Pod Autoscaler object is set in Initial mode, autoscaling both CPU and Memory.
The first couple of runs don’t have any resource requirements as VerticalPodAutoscaler takes a bit of time to learn resource usage. During that time, VPA reports “No pods match this VPA object” error. By the time CronJob wants to schedule a third job, VPA figured out these resource recommendations:
  Recommendation:
    Container Recommendations:
      Container Name:  backupjob
      Lower Bound:
        Cpu:     25m
        Memory:  262144k
      Target:
        Cpu:     25m
        Memory:  262144k
      Uncapped Target:
        Cpu:     25m
        Memory:  262144k
      Upper Bound:
        Cpu:     507m
        Memory:  530622257
During the next run, a Pod with 25m CPU and 262144k Memory requests is created. The excellent part of this is that as VPA runs using the Initial mode, no evictions or disruptions happen.
Now, let’s figure out how Vertical Pod Autoscaling works:
How does VPA work?
Vertical Pod Autoscaler consists of three different components:
- Recommender, which uses some heuristics to compute recommendations;
- Updater, which is responsible for evicting Pods when there is a significant drift in resource requirements;
- Admission Controller is a component responsible for setting Pod resource requirements.
Theoretically, you can easily swap one of the components with your custom-made one. And it should still work. Let’s go over the components in more detail:
Recommender
Recommender provides the core resource estimation logic. This component monitors the actual resource consumption and out-of-memory events and provides recommended values for containers’ CPU and memory requests. It stores recommendations in the VerticalPodAutoscaler object’s status field.
You can choose how Recommender loads initial historic CPU and Memory usage metrics. Recommender supports checkpoints (the default) and Prometheus. You can change the mode via the --storage flag.
Checkpoints store aggregated CPU and memory metrics in VerticalPodAutoscalerCheckpoint custom resource definition objects. You can describe the object to view the values stored. The recommender maintains checkpoints from real-time signals, which it starts collecting after historical metrics are loaded.
When using the Prometheus option, VPA Recommender executes a PromQL query using cAdvisor metrics. It allows you to fine-tune the labels used in the query. You can change the namespace, pod names, container names, and Prometheus job name labels. In general, it will send PromQL queries similar to:
rate(container_cpu_usage_seconds_total{job=”kubernetes-cadvisor”}[8d])and:
container_memory_working_set_bytes{job=”kubernetes-cadvisor”}These queries result in CPU and memory usage. The Recommender will parse results and use them for resource recommendations.
Once it loads historical metrics, it will start real-time polling metrics from the Kubernetes API Server via Metrics API (similar to kubectl top command). Additionally, it watches Out Of Memory events to adapt to these situations quickly. VPA then computes the recommendations, stores them in VPA objects, and maintains checkpoints. You can configure the poll interval via the --recommender-interval interval flag.
We will go over how VPA computes recommendations in VPA’s Recommendation Model section.
Updater
VPA Updater is a component responsible for updating Pods resource requirements to match recommendations. If VeritcalPodAutoscaler is in Recreate or Auto mode, Updater may decide to evict the Pod to have it recreated with new resources. In the future, the Auto mode will most likely change to take advantage of in-place updates, thus potentially avoiding evictions. An in-place pod resource update feature is still being developed. You can track the progress made on this GitHub issue.
Updater has a set of safeguards limiting Pods eviction:
Firstly, it won’t evict a Pod that doesn’t have at least two replicas. You can change this behavior by using the –min-replicas flag.
Secondly, as it uses the eviction API, it respects Kubernetes pod disruption budgets. Pod disruption budgets allow you to set availability requirements to stop the eviction of too many pods. For example, choosing the maximum unavailable of one would allow you to evict only a single Pod. You can read more about PodDisruptionBudgets here.
Thirdly, it will only allow 50% of the same replica set to be evicted by default. Even if you don’t use the pod disruption budgets, it will still try to evict slowly. You can change this flag via --eviction-tolerance.
Fourthly, you can also configure a global rate limiter, which would slow down eviction via the --eviction-rate-limit and --eviction-rate-burst flags. By default, they are disabled.
Fifthly, it checks eviction requirement settings, to check if it’s allowed to evict.
The updater decides to evict pods based on lower and upper bounds. It will evict a Pod if the request is lower than the lower bound or bigger than the upper bound and there is a significant change in resource requests versus the target estimation. Currently, VPA Updater looks for at least a 10% difference.
After the Updater evicts pods, the Admission Controller is the last component. It handles Pod Creation and applies the recommendations.
Admission Controller
Admission Controller is a component responsible for setting Pod resource requirements.
Before Kubernetes schedules a Pod, the Admission Controller will receive a webhook request from the Kubernetes API Server to update the Pods spec. The Admission Controller does this via mutating webhook configuration, which is explained in Kubernetes Admission Control documentation. You can view your mutating webhooks by executing:
kubectl get mutatingwebhookconfigurationsIf you installed VPA correctly, you should see a mutating webhook configuration for the VPA admission controller.
Once the Admission Controller receives a Pod request, it will match it to the Kubernetes VerticalPodAutoscaler object. If it doesn’t match, it will return the Pod unmodified. If the Pod matches the VPA object, then based on the VPA object’s configuration, it might update the Pod’s resource requests or both requests and limits. Note: It will not change the Pods’ resource requirements if the update mode is Off.
Let’s figure out how VPA recommends resources.
VPA’s Recommendation model for CPU usage
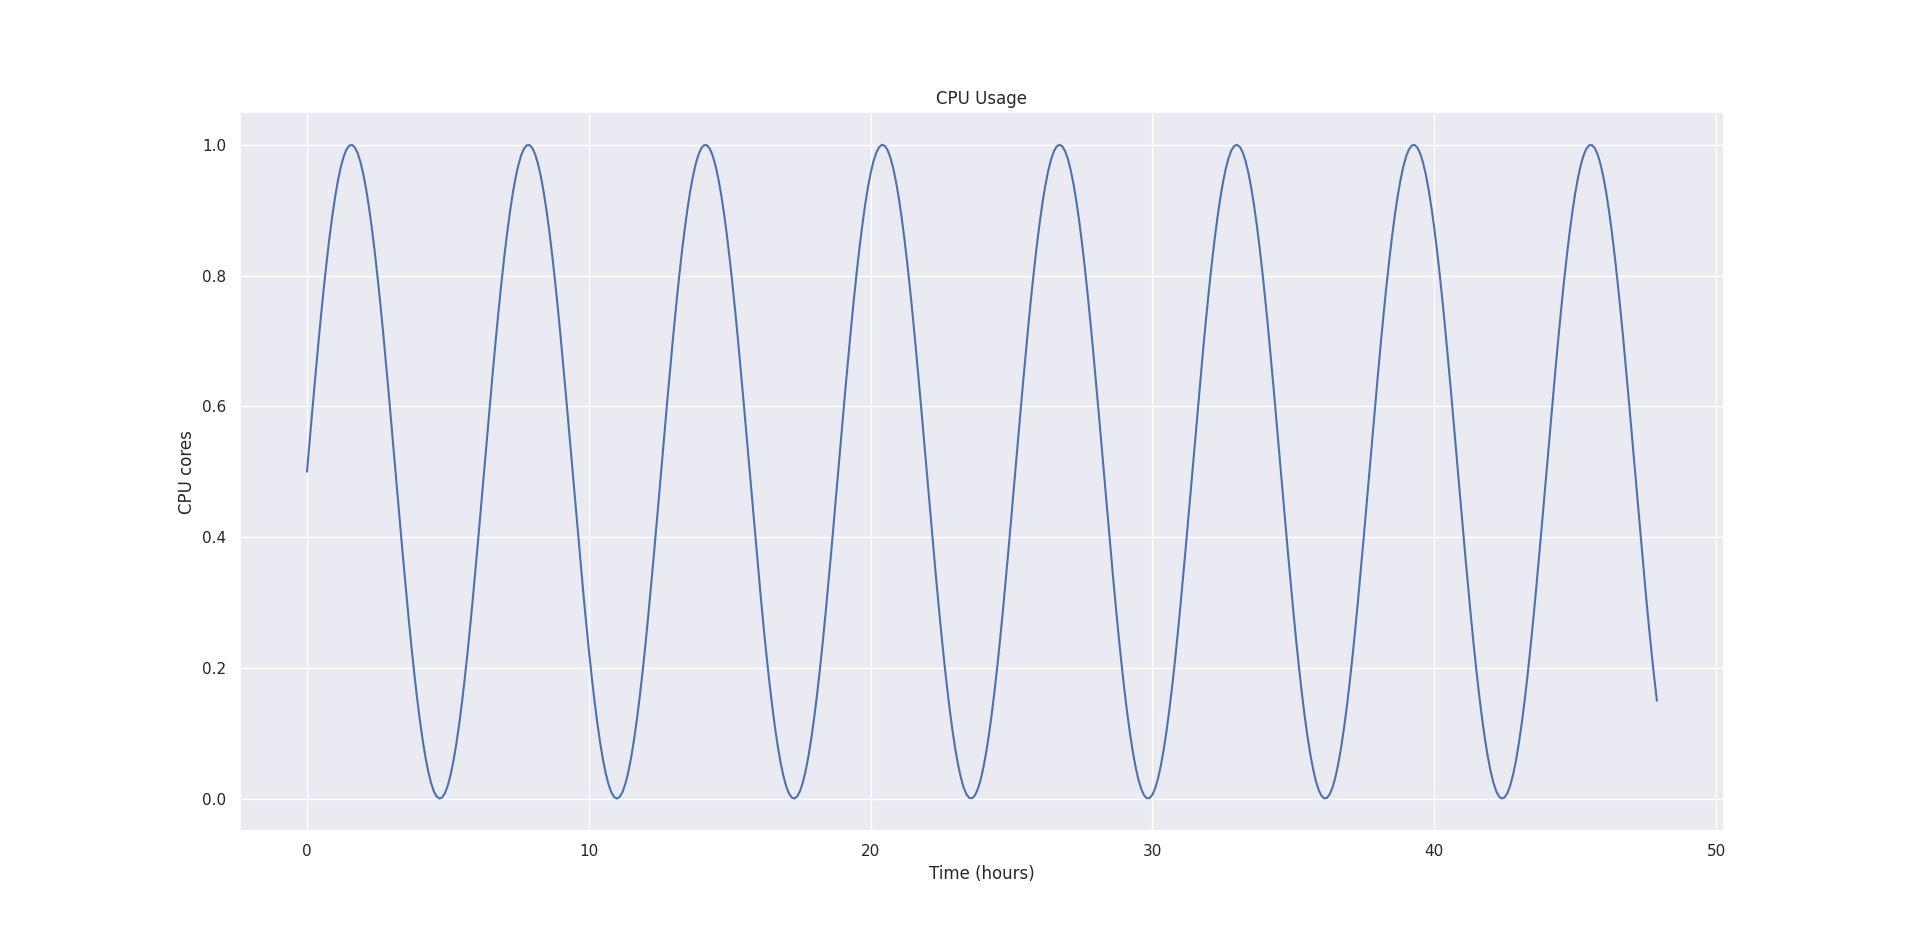
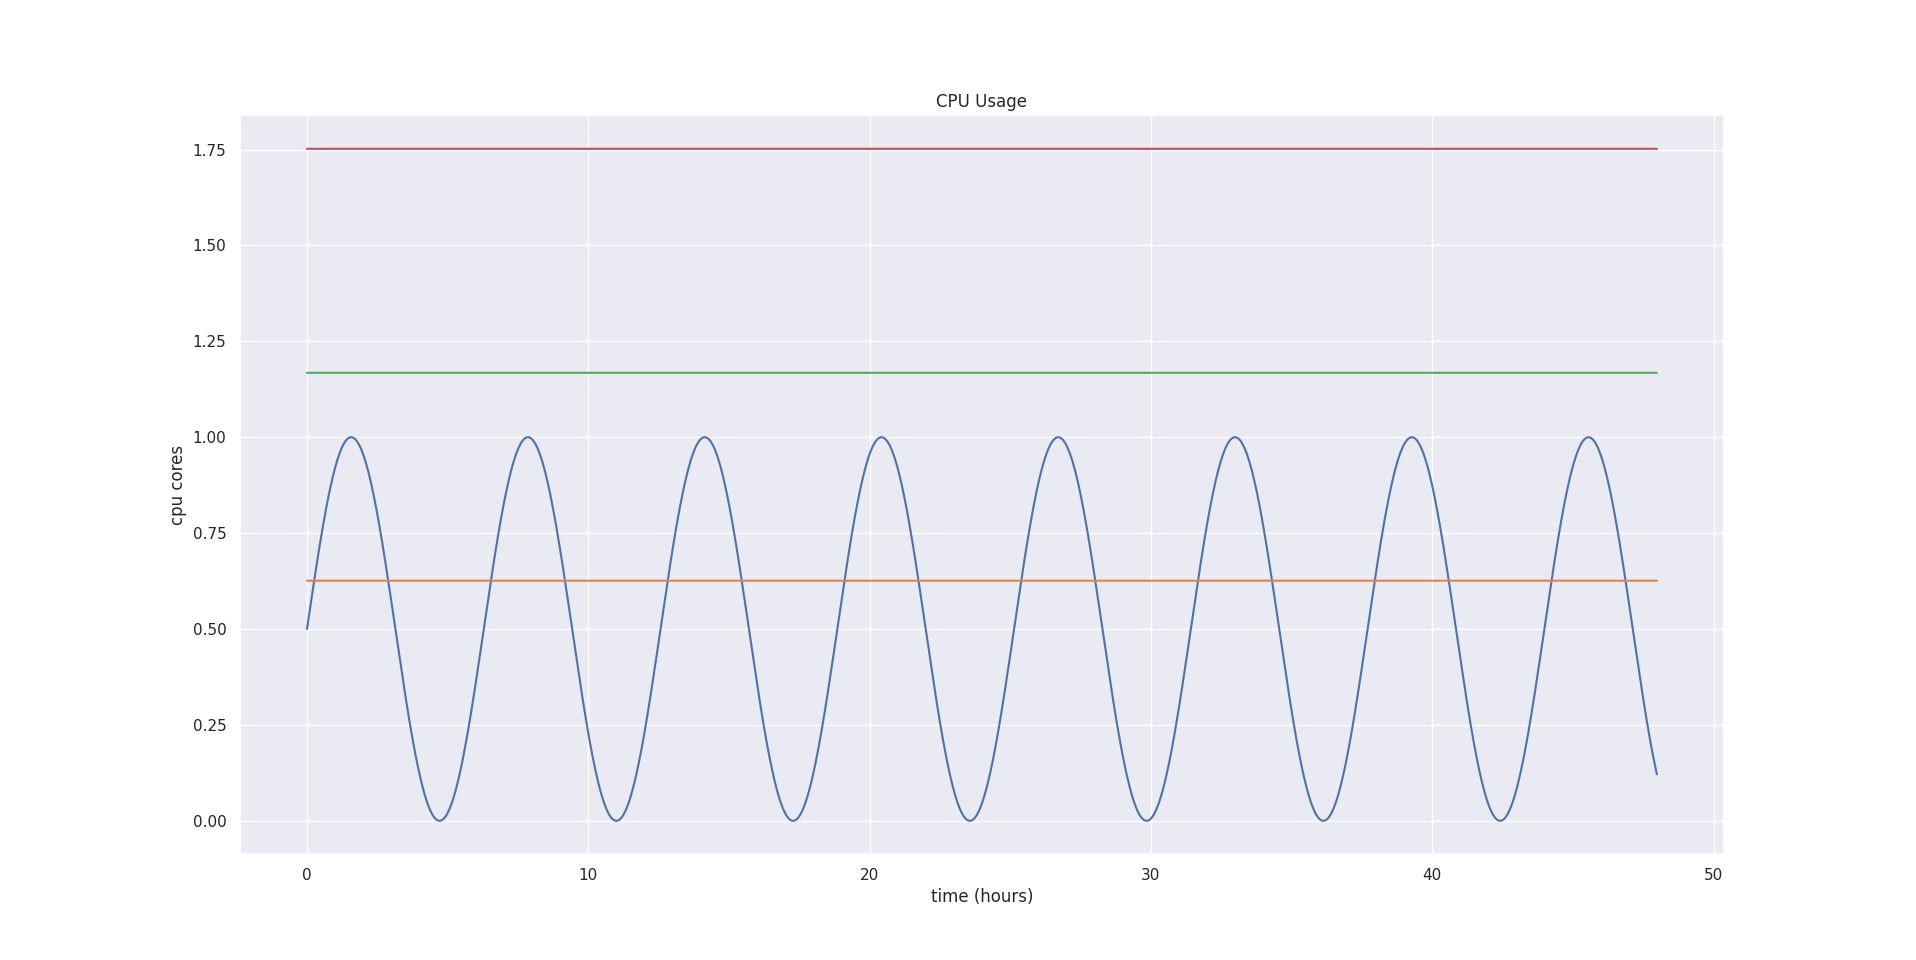
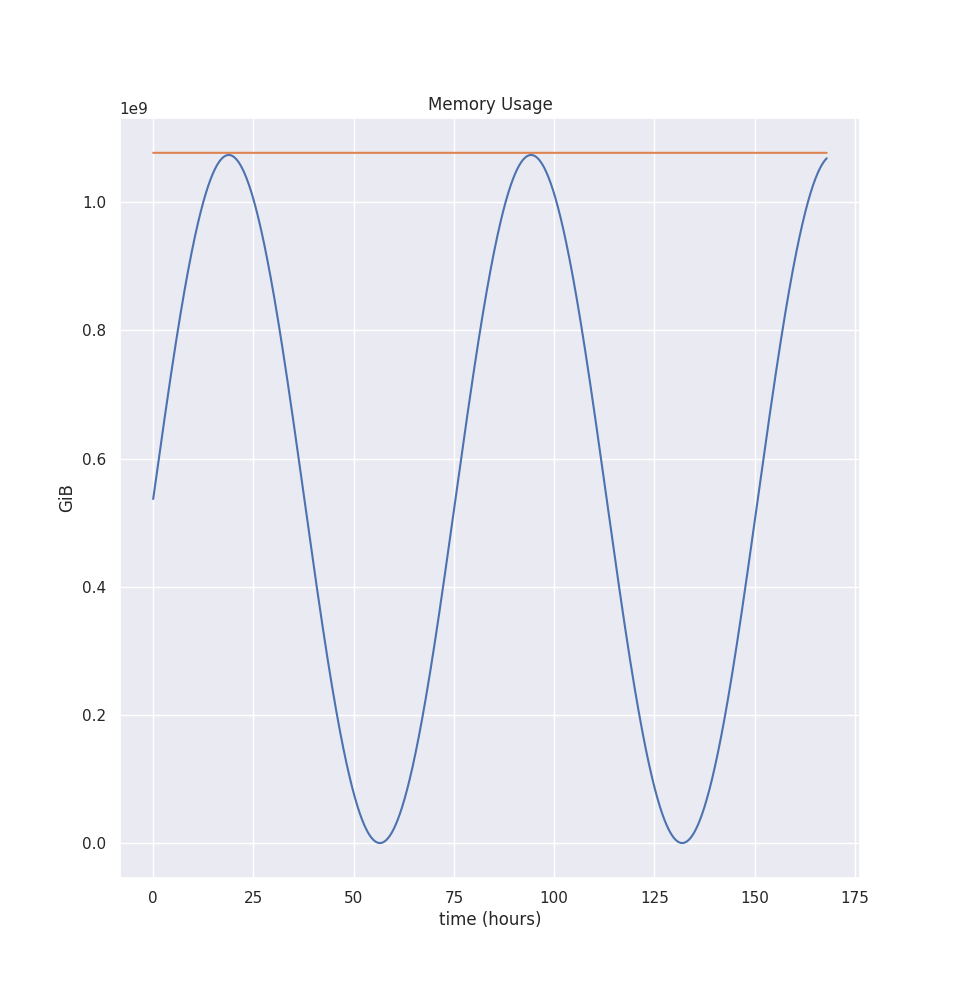
Let’s say we have a container, and we sampled it’s CPU usage every minute for 48 hours, and the CPU usage graph looks like this:
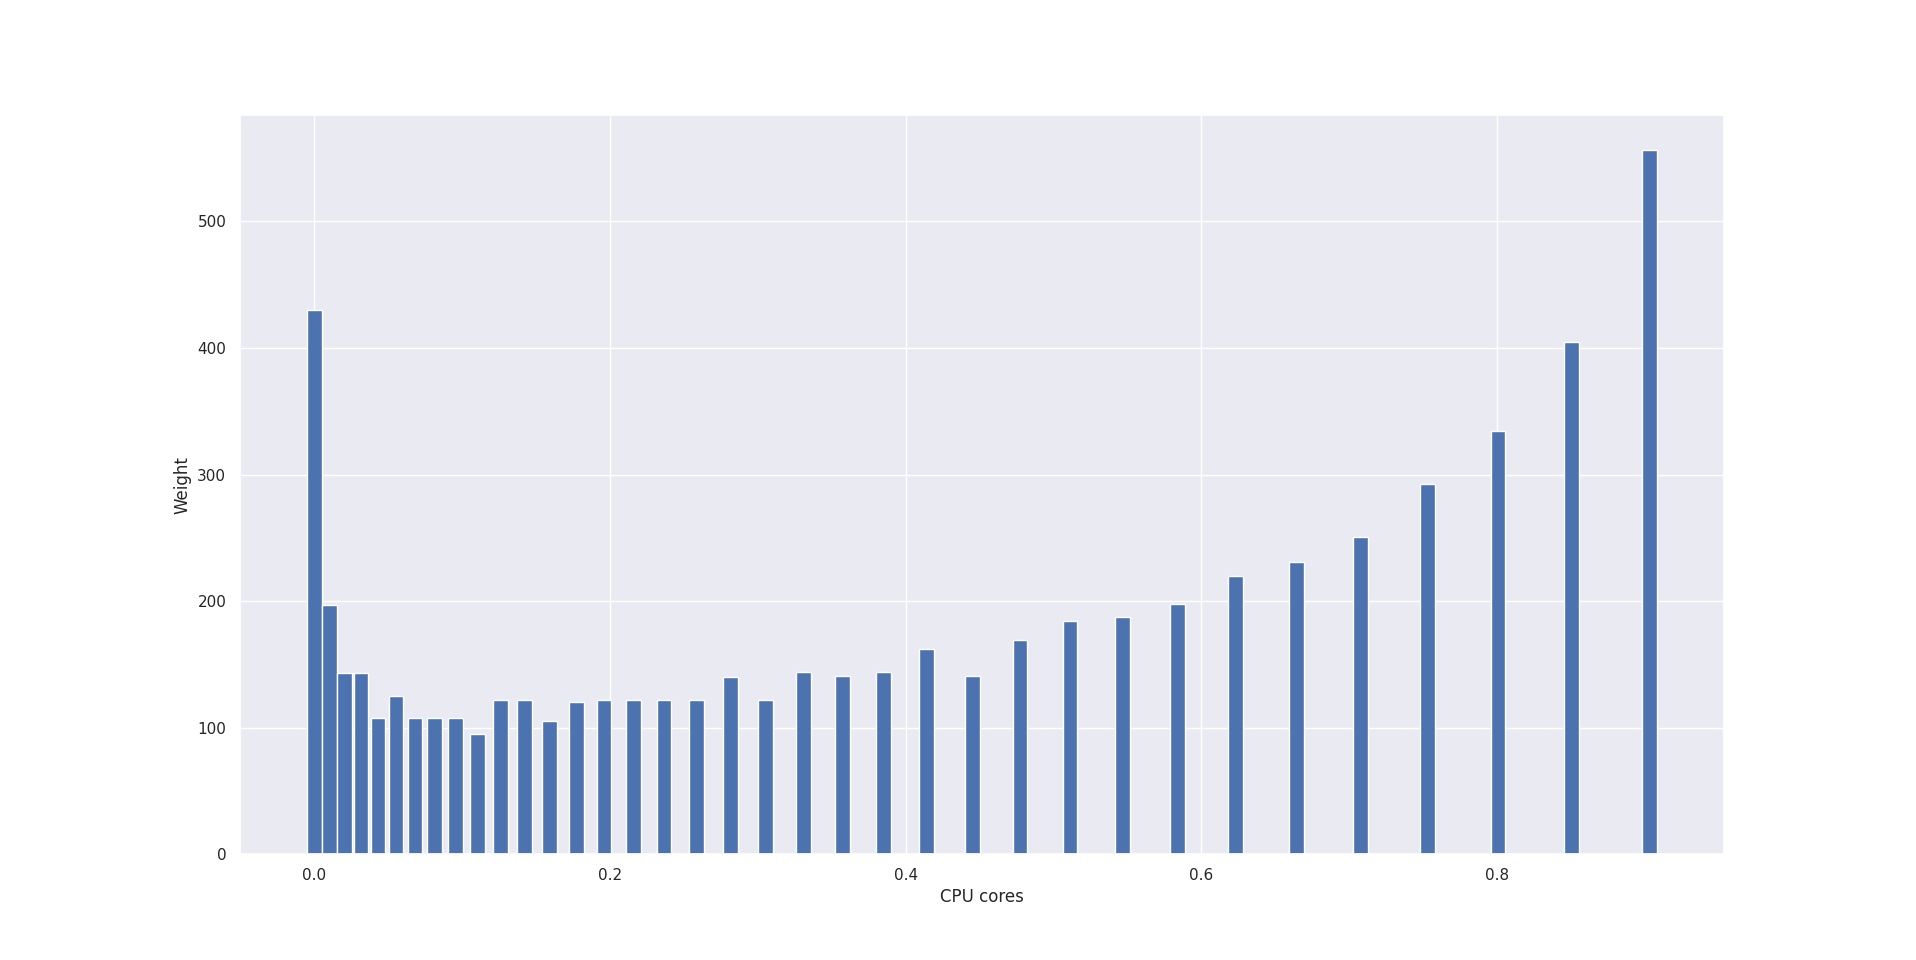
First, we create a histogram with exponentially growing bucket boundaries to compute CPU recommendation. The first bucket starts at 0.01 cores (1 millicore) and finishes at roughly 1000 CPU cores. Each bucket grows exponentially at the rate of 5%.
When we add a CPU sample to the histogram, we find the bucket based on actual CPU usage and add a weight based on the current Container’s CPU request value.
When CPU request increases, the bucket weight will increase too. This property makes previous observations less important, which helps to react to CPU throttling quickly.
Additionally, we decay the weight value based on time, with the default half-life of 24 hours. Thus if you add a new sample into the histogram, which is 24 hours old, its weight will be half of the container request at the time. Decying makes it that more recent samples have a more significant impact on the predictions than the older values. You can change the half-life of the weights by changing --cpu-histogram-decay-half-life flag.
Let’s put our example CPU usage graph shown in the first figure into this exponentially bucketed, weighted, decaying histogram. Let’s assume the CPU request was one core for all 48 hours.
The histogram looks like this:
Then, VPA computes three different estimations: target, lower bound, and upper bound. We use the 90th percentile for the target bound, the 50th percentile for the lower bound, and the 95th percentile for the upper bound.
Let’s compute bounds for the example provided in the first figure. The values are:
| Lower Bound | 0.5467 |
| Target bound | 1.0163 |
| Upper bound | 1.0163 |
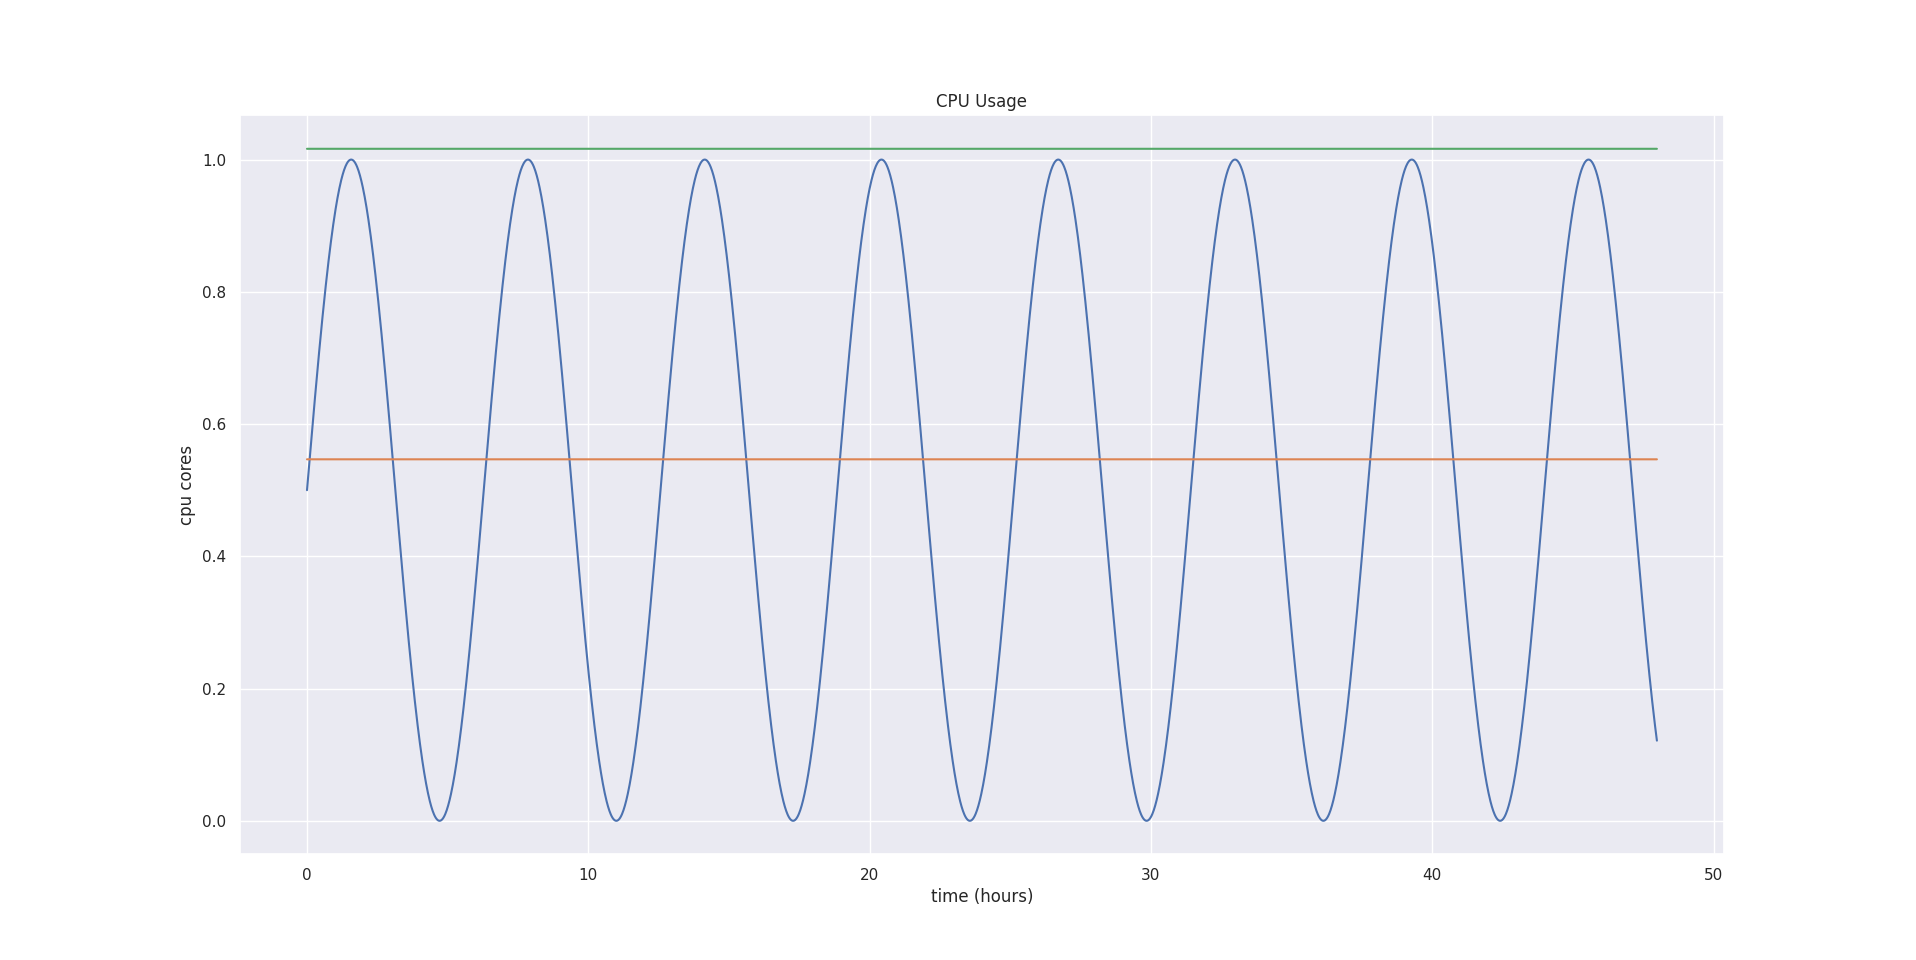
After we compute initial bounds, we add a safety margin so that our Container has some breathing room. For example, if it suddenly decides to consume more resources than previously, VPA adds a fraction of the computed recommendation. By default, it’s 15%. You can configure this value using the --recommendation-margin-fraction flag.
Then, we add a confidence multiplier for both upper and lower bounds. The confidence multiplier is based on how many days we have collected samples. For the upper bound, we compute estimation as:
estimation = estimation * (1 + 1/history-length-in-days)This formula shows that the more history we collect, the lower the multiplier is. Thus, the upper bound will close to the target bound as time passes. To better understand this formula, here are some sample multipliers for various history lengths:
| 5 minutes | 289 |
| 1 hour | 25.4 |
| 1 day | 2 |
| 2 days | 1.5 |
| 1 week | 1.14 |
| 1 week 1 day | 1.125 |
Our example had two days of metrics collected. So, the upper bound confidence multiplier is 1.5.
Similarly, for lower bound estimation, we also multiply it by the confidence interval. But we use a slightly different formula:
estimation = estimation * (1 + 0.001/history-length-in-days)^-2This formula shows that the more history we collect, the bigger the multiplier is. Thus, the lower bound will grow to the target bound as time passes. To better understand this formula, here are some sample multipliers for various history lengths:
| 5 minutes | 0.6 |
| 1 hour | 0.9537 |
| 1 day | 0.9980 |
| 2 days | 0.9990 |
As you can see, this rapidly grows to 1. Our example had two days of metrics collected. So, the upper bound confidence multiplier is almost 1.
Then, VPA checks if the estimations are above a minimum threshold. If they are not, VPA will set it to the minimum. Currently, the minimum for CPU is 25 millicores, but you can change the minimum via the --pod-recommendation-min-cpu-millicores flag.
After applying the safety margin and confidence multipliers to our example, our final estimation values are:
| Lower Bound | 0.626 |
| Target Bund | 1.168 |
| Upper bound | 1.752 |
Lastly, VPA scales the bounds to fit into minAllowed and maxAllowed configured in the VerticalPodAutoscaler object. Additionally, if Pod is in a namespace with LimitRanger configured, the recommendation is adjusted to fit into your LimitRanger’s rules.
VPA’s Recommendation model for Memory usage
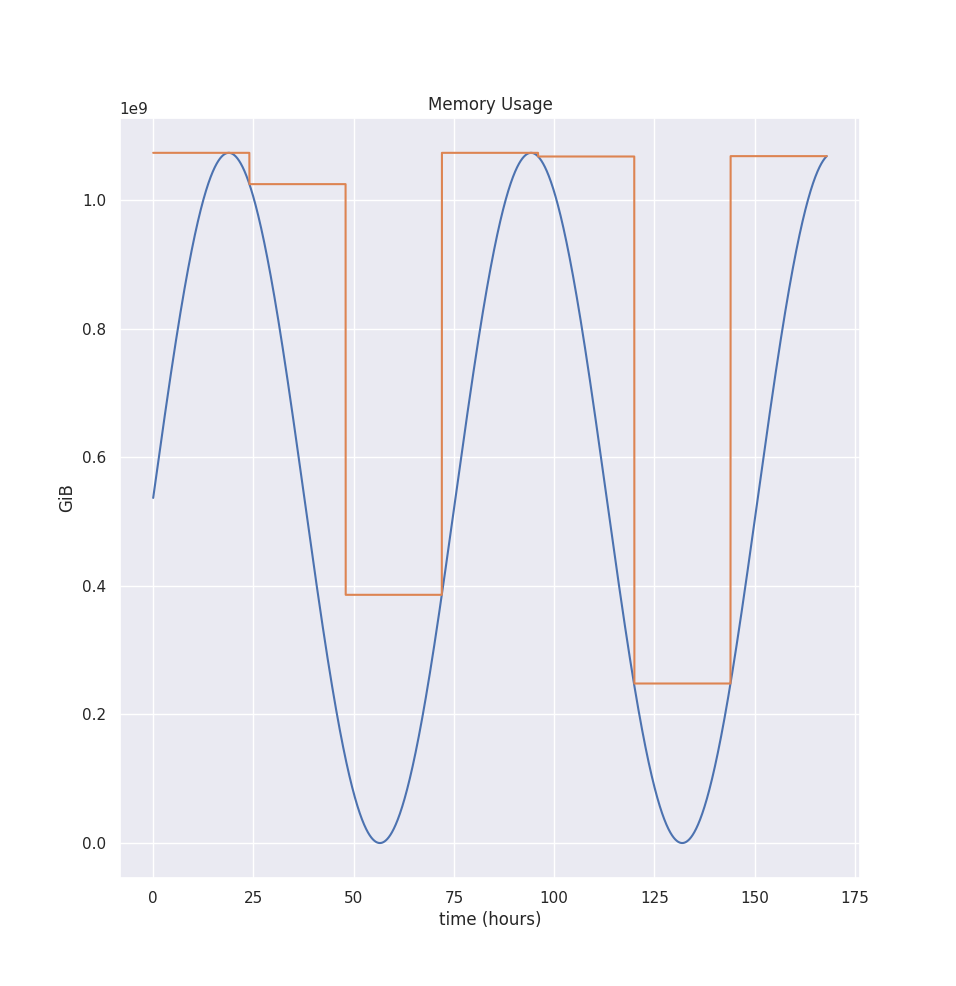
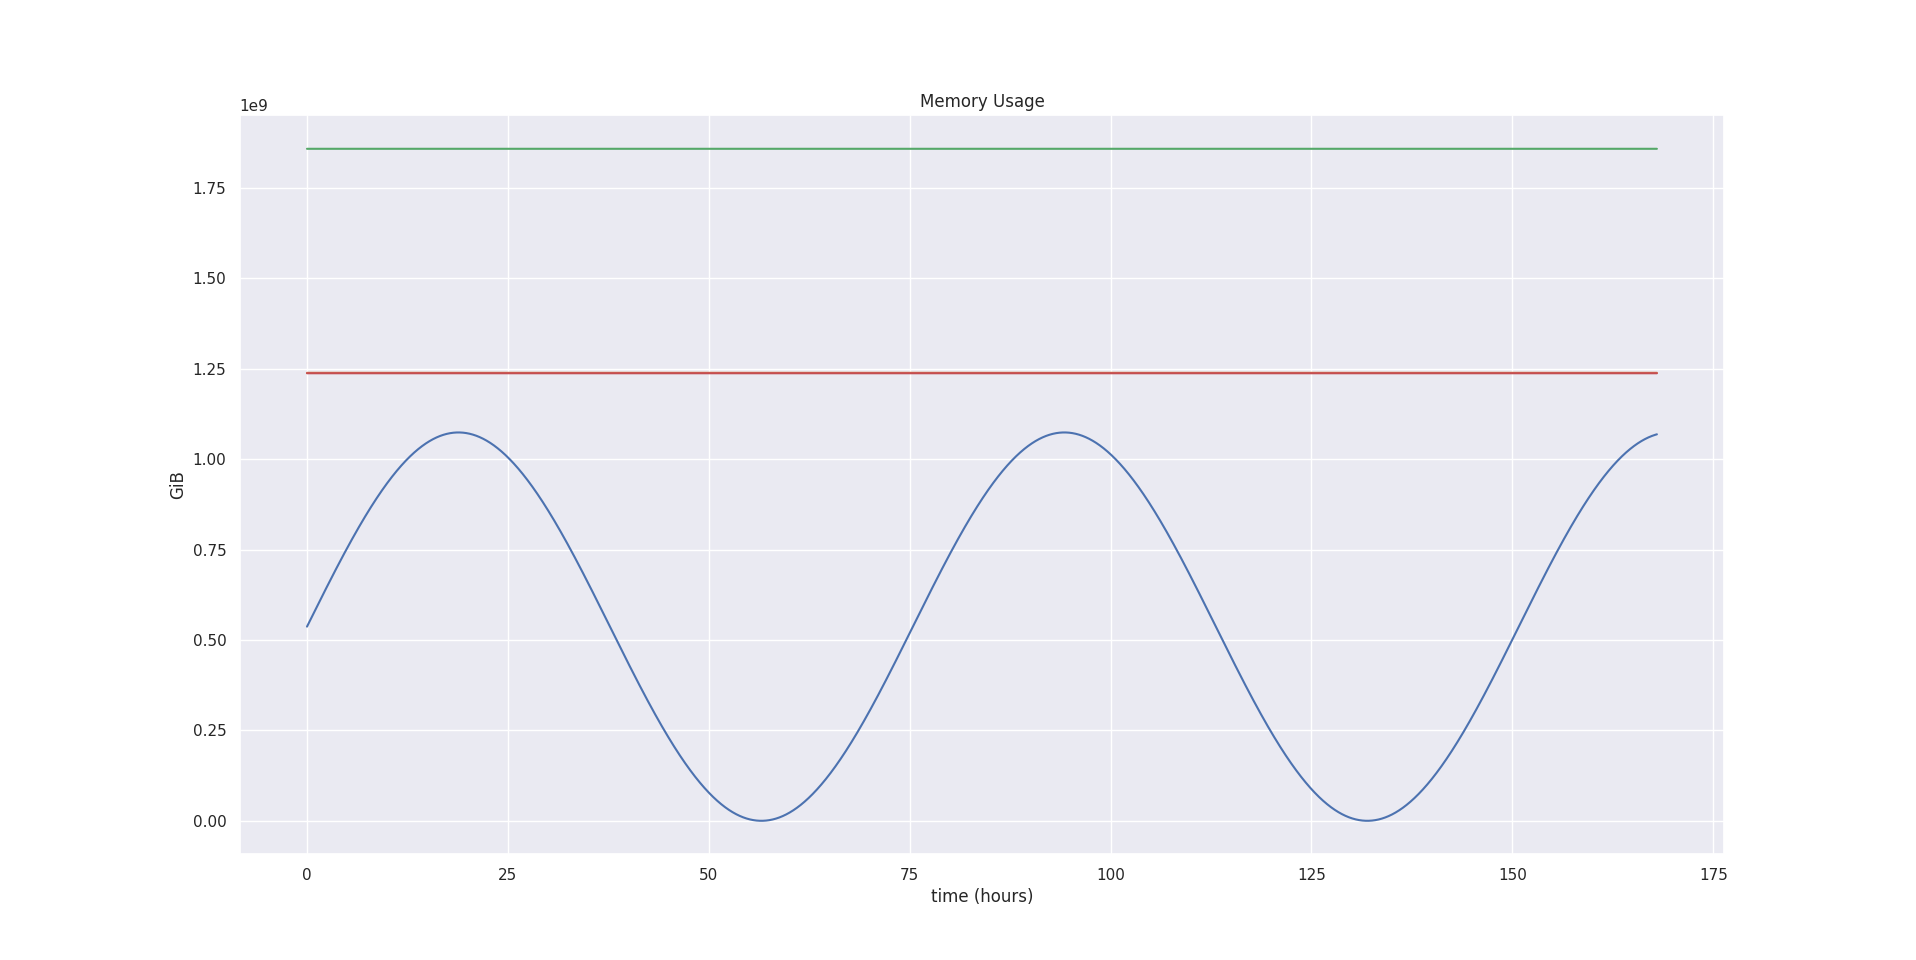
Although most of the recommendation algorithm steps are the same, there are significant deviations from the CPU estimation. Let’s start with the container’s memory usage, that looks like this:
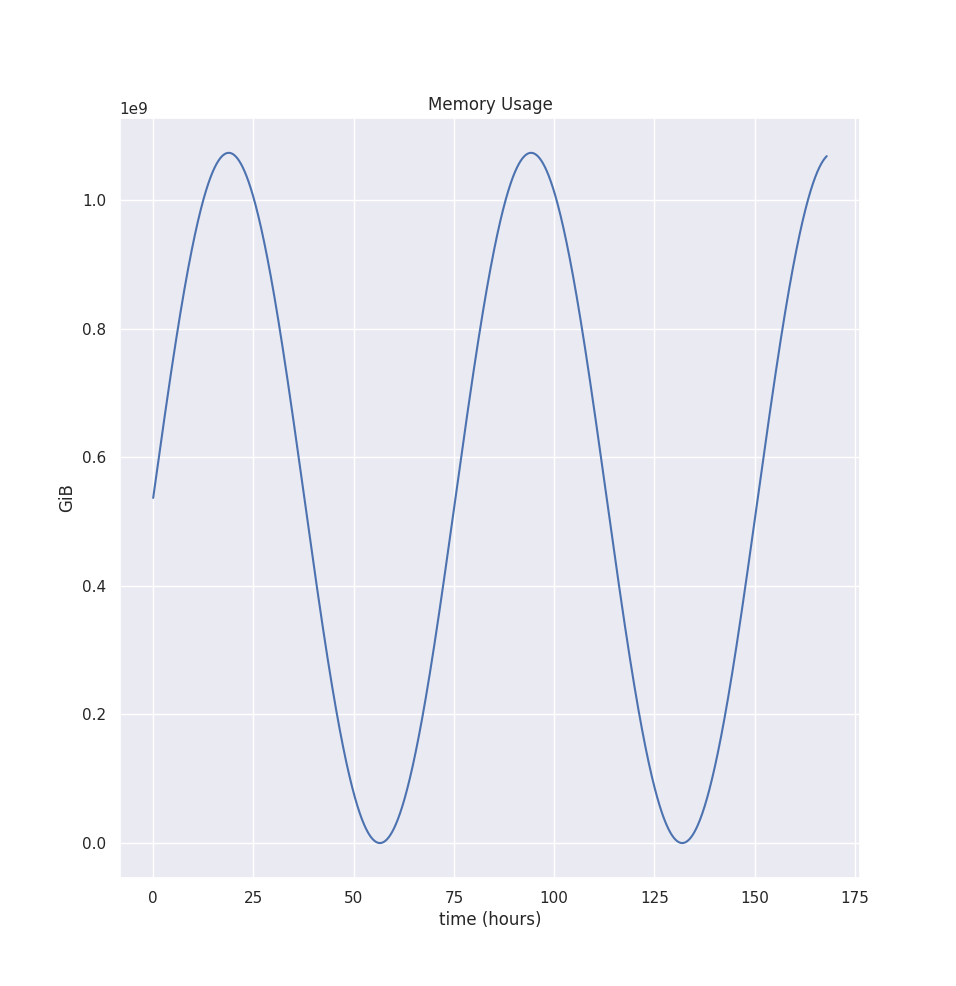
Note that the graph shows memory usage for seven days. The longer time interval is essential here, as memory estimation starts with computing the peak value for each interval. We use the peak value rather than the whole distribution because we typically want to provision memory close to the peak. As underprovisioning will terminate tasks with OOM kills. Meanwhile, the CPU isn’t that sensitive to this behavior, as Pods get CPU throttled, not killed.
So by default, the aggregation interval is 24 hours. You can change that via --memory-aggregation-interval flag. Additionally, we only keep eight intervals, but you change that via --memory-aggregation-interval-count flag. Thus, by default, we keep 8 * 24 hours = 8 days’ worth of memory peaks.
Let’s see how these peak aggregations look in our example:
Additionally, if we see an Out-Of-Memory event during that time, we parse the evicted memory usage and take the maximum value out of Memory used, adding 20% of the safety margin or 100MiB, depending on which is bigger. So this makes VPA adapt to OOM kills quickly.
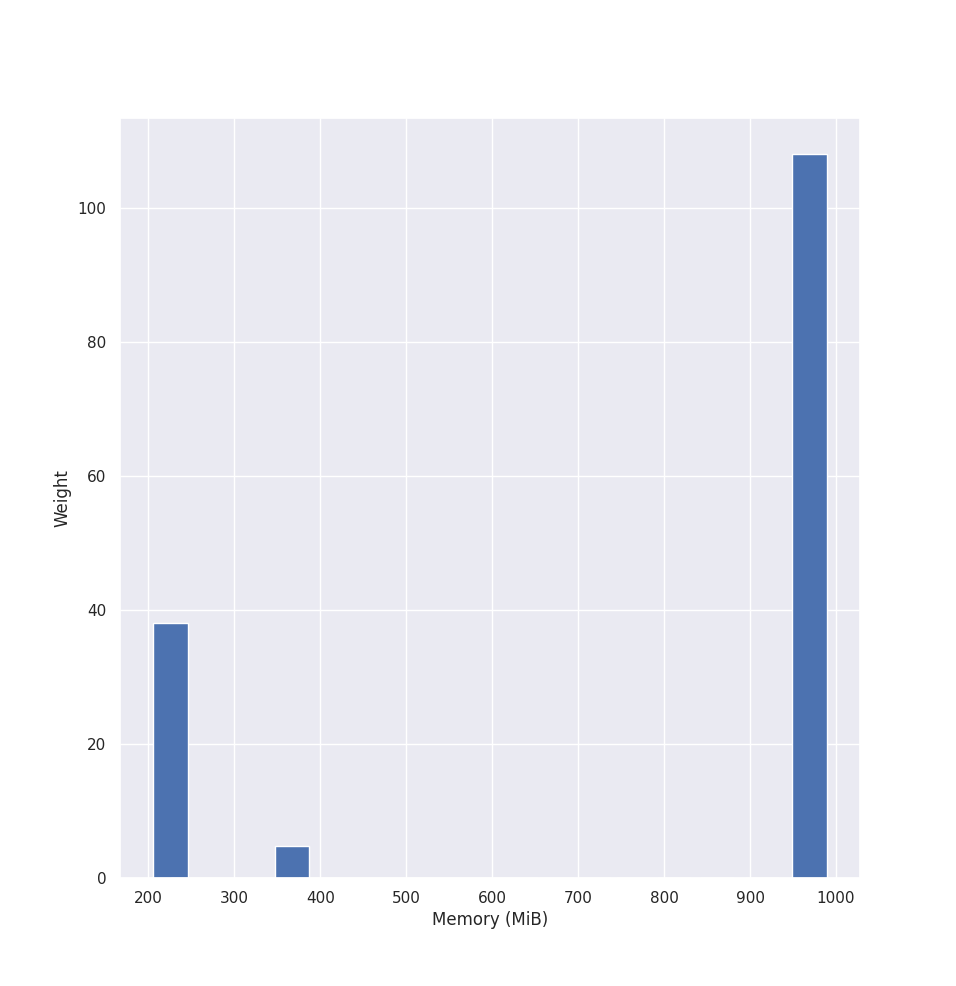
After we have the peaks, we put peak values into a histogram. VPA creates a histogram with exponentially growing bucket boundaries. The first bucket starts at 10MB and finishes at roughly 1 TB. Each bucket grows exponentially at the rate of 5%.
Similarly, we decay the sample based on time, with the default half-life of 24 hours. If you add a new sample into the histogram, which is 24 hours old, it will weight 0.5. Decying makes it that more recent samples have a more significant impact on the predictions than the older values. You can change the half-life of the weights by changing --memory-histogram-decay-half-life flag.
Let’s see how the histogram looks for our example’s peak values:
Then VPA computes three different estimations: target, lower bound, upper bound. We use the 90th percentile for the target bound, the 50th percentile for the lower bound, and the 95th percentile for the upper bound.
For our example. all three estimations are the same: 1027.2 MiB
After we compute initial bounds, we add some safety margin so that our Container has some breathing room. I.e., if it suddenly decides to consume more resources than previously. VPA adds a fraction of computed recommendation. By default, it’s 15%. You can configure this value --recommendation-margin-fraction flag.
Then, we add a confidence multiplier for both upper and lower bounds. The confidence multiplier is based on how many days we have collected samples. The formulas are the same as for the CPU estimations.
Then, VPA checks if the estimations are above some minimum threshold. If they are not, VPA will set it to the minimum. Currently minimum for Memory is 250 MiB. You can change the minimum via --pod-recommendation-min-memory-mb flag.
After applying the safety margin and the confidence multiplier, our final estimation values are:
| Lower Bound | 1237422043 bytes = 1.15 GiB |
| Target Bound | 1238659775 bytes = 1.15 GiB |
| Upper Bound | 1857989662 bytes = 1.73 GiB |
Lastly, VPA scales the bounds to fit into minAllowed and maxAllowed configured in VerticalPodAutoscaler object. Additionally, if Pod is in a namespace with LimitRanger configured, the recommendation is adjusted to fit into your LimitRanger’s rules.